


 Nghề nghiệp :
  Sở thích :
 Windows XP
- Vào menu Start, chọn Control Panel.
- Nhấp đúp vào Network Connections.
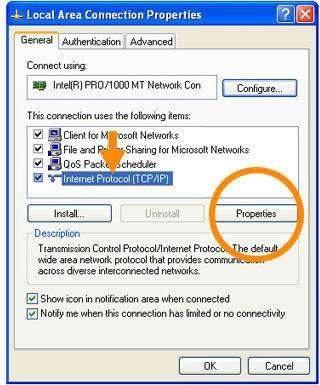
- Nhấp chuột phải vào kết nối hiện tại, chọn Properties.
- Chọn Internet Protocol (TCP/IP) và nhấp vào Properties.
- Trong phần “Use the following DNS server addresses”, bạn nhập nội dung “Preferred DNS server” và “Alternate DNS server” như sau:
Preferred DNS server: 208.67.222.222
Alternate DNS server: 208.67.220.220
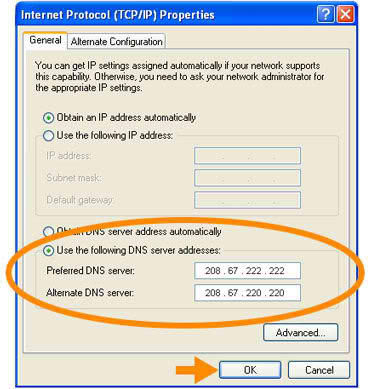
- Nhấn OK để lưu cấu hình lại.
Tương tự với windows Vista và Windows 7:
- Vào menu Start, chọn Control Panel.
- Nhấp đúp vào Network Connections.
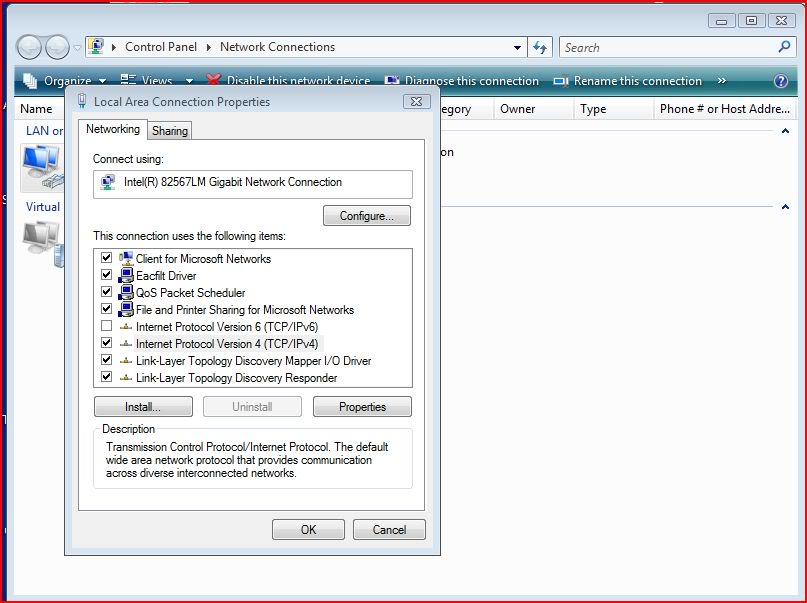
- Nhấp chuột phải vào kết nối hiện tại, chọn Properties.
- Chọn Internet Protocol (TCP/IP) chú ý là Verson 4 và nhấp vào Properties.
- Trong phần “Use the following DNS server addresses”, bạn nhập nội dung “Preferred DNS server” và “Alternate DNS server” như sau:
Preferred DNS server: 208.67.222.222
Alternate DNS server: 208.67.220.220
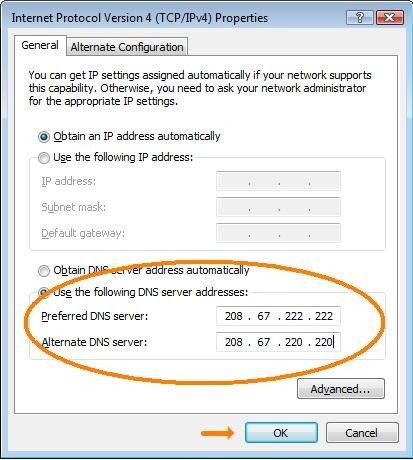
- Nhấn OK để lưu cấu hình lại.
Bây giờ bạn có thể vào Facebook bình thường rồi đó.
- Vào menu Start, chọn Control Panel.
- Nhấp đúp vào Network Connections.
- Nhấp chuột phải vào kết nối hiện tại, chọn Properties.
- Chọn Internet Protocol (TCP/IP) và nhấp vào Properties.
- Trong phần “Use the following DNS server addresses”, bạn nhập nội dung “Preferred DNS server” và “Alternate DNS server” như sau:
Preferred DNS server: 208.67.222.222
Alternate DNS server: 208.67.220.220
- Nhấn OK để lưu cấu hình lại.
Tương tự với windows Vista và Windows 7:
- Vào menu Start, chọn Control Panel.
- Nhấp đúp vào Network Connections.
- Nhấp chuột phải vào kết nối hiện tại, chọn Properties.
- Chọn Internet Protocol (TCP/IP) chú ý là Verson 4 và nhấp vào Properties.
- Trong phần “Use the following DNS server addresses”, bạn nhập nội dung “Preferred DNS server” và “Alternate DNS server” như sau:
Preferred DNS server: 208.67.222.222
Alternate DNS server: 208.67.220.220
- Nhấn OK để lưu cấu hình lại.
Bây giờ bạn có thể vào Facebook bình thường rồi đó.

